Masking In Alight Motion Apk
How to do Masking in Alight Motion – Complete Guide With Unique Techniques and Tips 2026
Alight Motion is the best video editing app. It has multiple premium features, effects, and editing tools that are not available in other editing applications. In today’s guide, we will discuss its magical and prominent feature, “The Masking”. This feature is widely used in professional editing, such as Movies and Dramas.
Maybe you have seen the “Seeta aur Geeta.” OR “JUDWAA” movies. The main character performs two roles simultaneously in a single frame. Have you ever wondered how it is possible? Well, this is the complete guide. Where we will learn about masking, types, using, and some advanced techniques for doing it professionally.
The masking gives you full control over your media. With its help, you can create dynamic transitions, add cool effects, and slick animations. After learning it, you will be able to take your editing to the next level.
What is Masking in Alight Motion?
Masking is an advanced editing technique in Alight Motion. It is used to hide or reveal specific parts of your media using pre-built or custom shapes. It can also be used across multiple layers to create stunning, cinematic effects without being noticed. This is the core concept behind the Mask. These masking shapes basically are circles, squares, and rectangles, or your custom shapes.
Moreover, you can add the keyframes to your Mask to make it more professional. Before you use masking, first let’s get familiar with the concepts used in it. To be masked and the Mask.
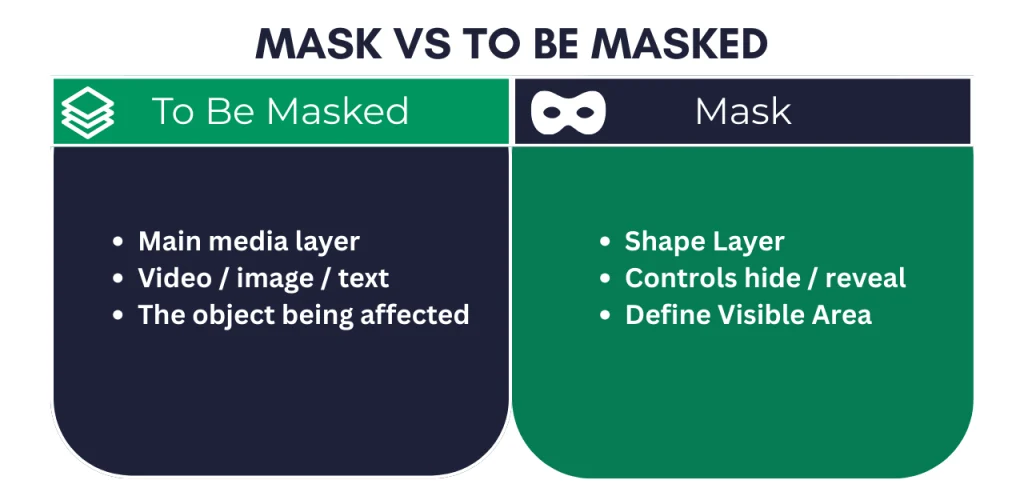
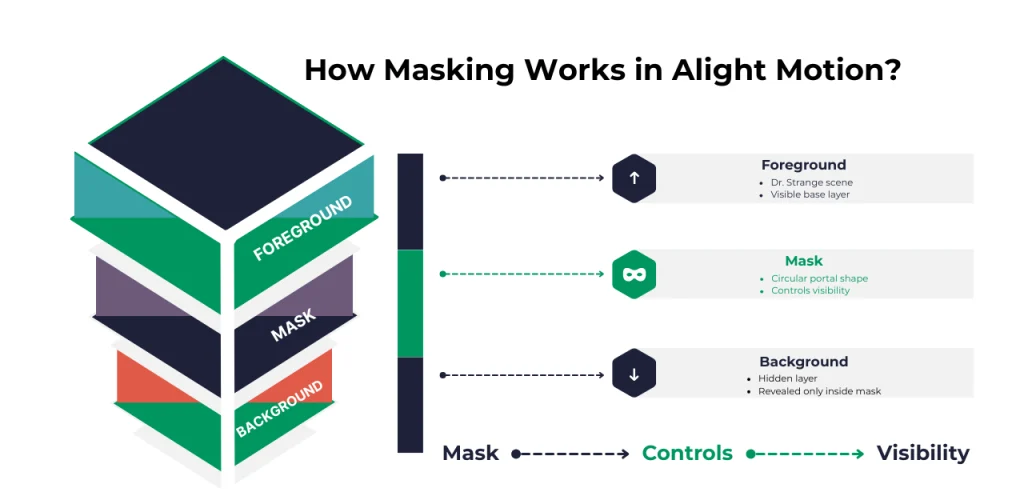
To better understand masking, let me give you an example. The greatest example of masking is Dr. Strange from Marvel Comics. When he uses his finger to make a portal. The to-be-masked layer is the current layer where Dr. Strange is opening the portal. And the mask layer is the portal. The scene in the portal is another layer, which is a background layer. The whole scene is created by merging multiple layers. To understand better, follow these explanations:
The whole combination is created by hiding the complete background layer. Then it reveals a specific part of the background through a circular portal.
Now we have learned the basic concept of masking. What is it? And how it can be used. Regularly practicing and experimenting with different effects and animations will make you a pro.
Usage of masking
Masking is used to hide or reveal specific parts in the media. You can add it to text, images, and videos. If you want to add an effect to a specific part of the media, you have to use a mask to apply it. If you want to highlight certain parts of your video, you can use it. The best example of it is documentary and explanatory videos. Also, it can be used in text for styling, such as revealing text and animated revealing titles.
Types of Masking in Alight Motion
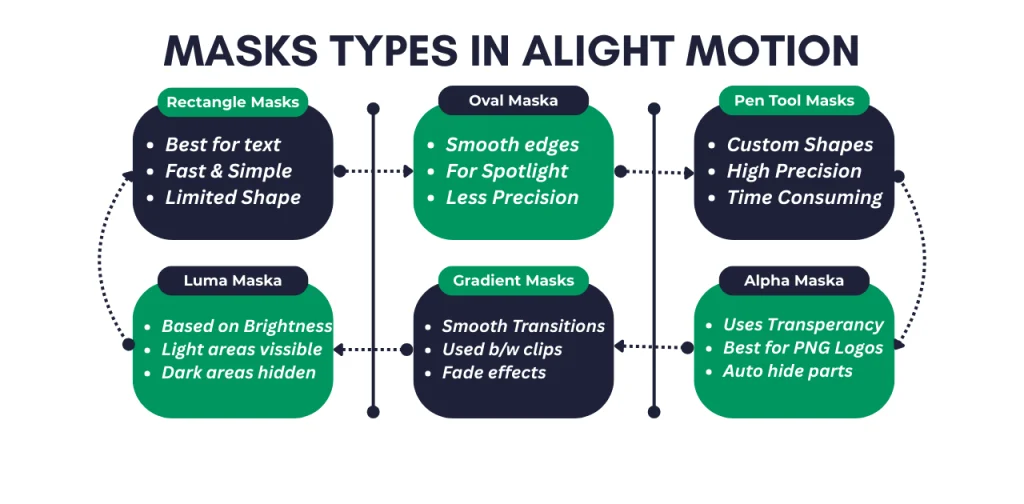
In Alight Motion, you will get the three main types of masks to create masking effects.
Rectangle Masks
The basic masking types in Alight Motion are Rectangle & Square. These masks feature adjustable corners, so you can customize them to your needs and preferences. Rectangle masks are used for simple masking with basic geometric shapes.
Advantages of Rectangle Masks
Disadvantages of Rectangle Masks
Oval and Mask Objects
These mask shapes come in circular and oval shapes. This is commonly used for great focal length and vignetting effects.
Advantages of Rectangle Masks
Disadvantages of Rectangle Masks
Pen Tool / Custom Mask
To gain full control over your masks, use the pen tool to create them. It can be generated from freeform Bezier curves to create any custom shape. These masks are best for precise masking, but they can take a long time to create.
Advantages of Rectangle Masks
Disadvantages of Rectangle Masks
Alpha Masking
These masks are well known for their transparency. Alpha masks are mostly used for PNG images and brand logos. The transparent area of the image will be automatically hidden, leaving the other part visible. The alpha mask is used for revealing the brand logo in your project. Moreover, it can be animated to create motion effects for your logo.
Gradient Masking
This type of Mask is used for the transitions between videos. Where the first clip will slightly disappear, and the second clip gradually become visible on the screen. To make a super cool effect, it uses color combinations. You can use any color to make it super cool and smooth.
Inverted Mask
This Mask explains itself by its name. When you use this Mask, the foreground will disappear, leaving the background visible. In simple words, the front layer will disappear, and the back layer will appear in the selected mask shape.
Luma Masking
Luma masking works on the brighter and darker areas of your media. When you use it, the darker areas of the videos will disappear, and the light areas will become slightly lighter. This will work well, if the media have more dark areas than light ones.
How to create a mask in Alight Motion?
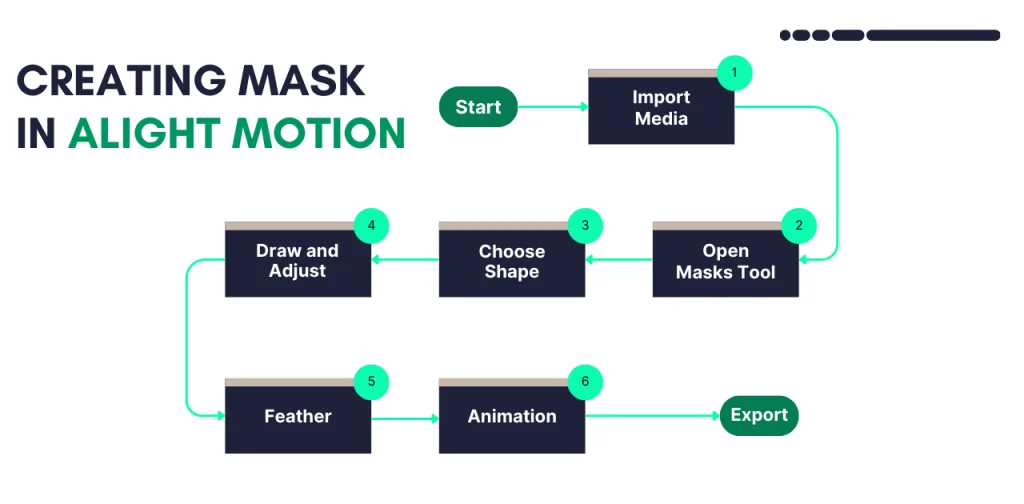
Creating masks in Alight Motion is quite easy and simple once you get familiar with the steps. Essential steps for creating any mask are explained below:
Add a Media
First, import the media where you want to apply masking. It can be a video, an image, or any other object. After importing, select the media where you want to add a mask.
Open Masking Tool
After selecting the object, tap the “Mask” from the toolbar to open the mask shape and settings. Or tap the (+) button on your layer, then select Mask.
Choose Mask Shape / Type
From shapes, select any of your desired shapes, such as Rectangle, Square, or Oval. You can also use the pen tool to create your own custom shape.
Draw the Mask & Adjusting
After selecting the mask shape, draw the Mask with your fingers at the point where you want to use it. After drawing, you can adjust the shape using the anchor points of your shape. Change its positions, resizing, and upscaling, whatever you want, you can do.
Feathering the Edges and Animating
Now open the mask feather’s settings and play with them until you get the perfect effect. The higher the feather values, the more blur on the mask edge. You can also animate several properties of the Mask. Apply keyframes to them, tweak the curves until you get something perfect.
Congratulations, you have created the first Mask in Alight Motion Pro Apk. Now you need more practice and experiments with different mask types, and use the pen tool to create your custom masks. Over time, you will become an expert in masking.
Pro Tips for Better Masking
Some difficulties and mistakes beginners face.
Final Words
Masking in Alight Motion is a prominent feature of the app. Each editing tool in Alight Motion has its own characteristics and uses. Masking is used to create cinematic, professional effects in the videos. Don’t get overwhelmed in the initial stages of learning masking. This is a time-consuming and experimental process. Doing practice will enhance your overall skill in masking. This guide will help you understand masking and use it accurately.